Table of contents
- Introduction
- Design and requirements
- Creating the App Registration
- Configuring API Management to use Managed Identity
- Configuring the Logic App
- Thoughts on automation and permissions required
Introduction
In my journey to properly secure Logic Apps with HTTP triggers, I went through many different articles, blog posts, forums, and the official documentation on how to implement authentication. After doing my own testing and thinking, I found that many guides include unnecessary configurations that could actually be exploited and used as persistence mechanisms by an attacker. That led me to write this post.
From what I’ve seen, many people approach Logic App authentication as if they were securing an SPA or web app, where users sign in through the front end. Since Easy Auth originates from App Services, the settings provided push you in this direction, so I get why so many people get it wrong. But in Azure Integration, Logic Apps are primarily used in machine-to-machine communication scenarios, making this approach flawed.
There are some gotchas when enabling Easy Auth in Logic Apps, and if you don’t account for them, an attacker could bypass your token requirements. For example:
- The default settings still allow authentication via SAS keys, which we don’t want.
- Some undocumented settings exist that help prevent token bypassing.
- The Azure Portal requires allowing unauthenticated requests to manage workflows.
- Automating this setup securely requires the right Entra ID permissions without handing out dangerous privileges.
In this post, I’ll show you how to configure authentication with only the minimal settings required to lock things down. This makes automation possible since it doesnt require insane permissions to be given to a pipeline.
Design and requirements
Desired outcome
To define what we need, we first need a goal. The goal is that only HTTP requests with an Entra ID access token meeting our requirements can trigger the Logic App workflow. It should not be possible to trigger it using a access key. The workflow should only be triggered by API Management.
We will use Easy Auth, which provides built-in authorization features, but we will not use or validate Application Roles.
API Management will authenticate against Entra ID using its System Assigned Managed Identity, requesting a token with the audience set to the App Registration representing our Logic App.
This setup is primarily intended for Managed Identity, but also works if you want to use an App Registration. You then need to add an identifier URI when creating the app.
Token requirements
Our requirements for a secure enough solution will be:
- The token must be issued by our Entra ID tenant.
- The token’s audience must be the App Registration representing our Logic App.
- Only the Managed Identity of our API Management instance should be allowed.
Components
- Entra ID App Registration (Representing our Logic App).
- Logic App Standard Authentication/Easy Auth.
- Setting in Logic App or workflow condition to prevent token bypass.

Creating the App Registration
This is where I’ve seen the most confusion about what is actually needed.
All we need here is a blank App Registration. Its sole purpose is to act as an audience for our Logic App. The Easy Auth feature requires an App Registration to function, so we must specify one.
The best way to create this is through Azure CLI. If you use the Azure Portal, it applies a different template and adds unnecessary configurations for our scenario.
Azure CLI command to create the App Registration:
az ad app create --display-name my-app-name
If you want to use an App Registration to get the access token and not a Managed Identity, you have two options here:
- Create the App Registration with an Application ID URI:
az ad app create --display-name my-app-name --identifier-uris api://my-app-name
If you want to generate an access token for this resource using an App Registration, you use “api://my-app-name/.default” as your scope.
- Do not create the app with an Application ID URI. You can then use the v1 version of the OAuth 2.0 token endpoint when requesting the token. This version supports the “resource” parameter, where you provide the Application ID of your audience instead of using a scope.
This creates a blank App Registration, which is exactly what we need. It does NOT do the following:
- Create unnecessary redirect URIs.
- Generate unnecessary client secrets, which is the biggest flaw I’ve seen in other guides.
- Configure “Expose an API” and create unnecessary scopes. (Unless you opted in for this method above)
- Add unnecessary Graph permissions.
- Create an unnecessary Enterprise Application (Service Principal).
These settings are typically used in scenarios involving SPAs or web apps, where the application itself authenticates against Entra ID, signs in users, and stores tokens. That’s not what we’re doing here.
There also seems to be some confusion around the client secret. The documentation states: “If the client secret isn’t set, sign-in operations from the service use the OAuth 2.0 implicit grant flow, which isn’t recommended.”. This is true, but it doesn’t apply to our case, so we can ignore it.
The Enterprise Application that normally gets created when setting up an App Registration in the portal is also completely unnecessary for us. It would only be useful if the App Registration contained Application Roles that we needed to grant to other apps. That’s something I do recommend when securing APIs in API Management, but it’s not needed here.
Configuring API Management to use Managed Identity
This is where the actual authentication happens. API Management will authenticate against Entra ID using its System Assigned Managed Identity, requesting an access token with the audience set to the App Registration representing our Logic App. This bearer token will then be included in the Authorization header.
The only configuration needed is adding this snippet to your API policy before the request is sent to the backend.
<authentication-managed-identity resource="c58802c5-7cc0-4f1b-bc27-ecbbf0e7aa35" />
Reference: https://learn.microsoft.com/en-us/azure/api-management/authentication-managed-identity-policy
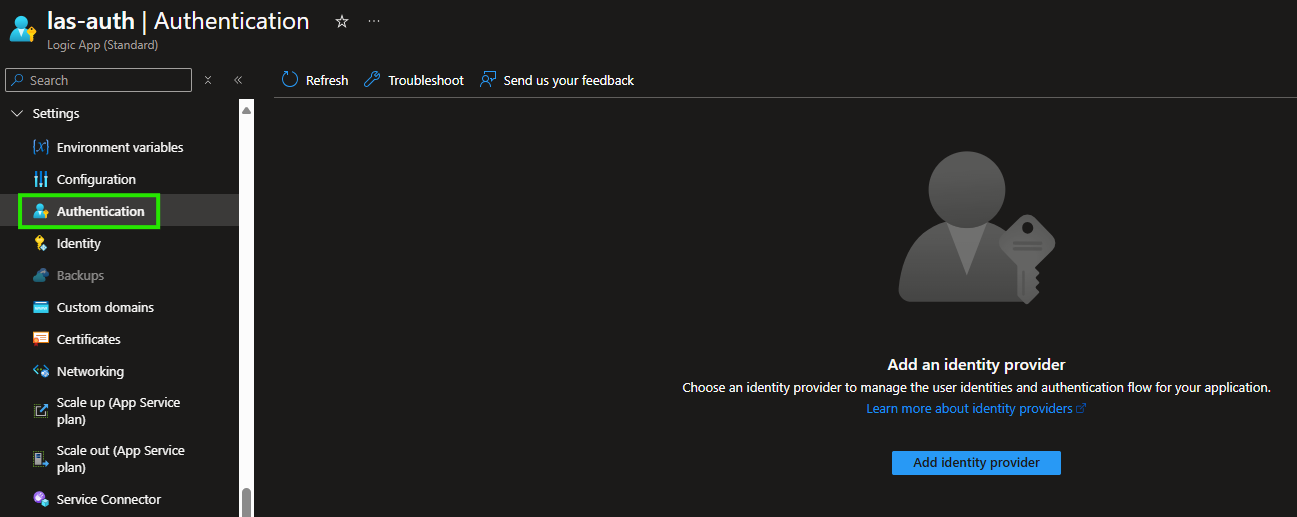
Configuring the Logic App
To make our Logic App Standard require and validate Entra ID tokens, we need to configure Authentication, commonly known as Easy Auth.
So what is Easy Auth and how does it work?
This feature is also available in Function Apps and App Services. Most of the official documentation is found under the App Service page. Since Easy Auth originates from App Services, it’s easy to see why so many misunderstand the configuration needed for machine-to-machine scenarios. The documentation mainly focuses on signing in users, which isn’t relevant for Logic Apps in most cases.
According to the official documentation, Easy Auth is a middleware component that runs on the same VM as your application. Logic App Standard on Windows runs in a secure environment called a sandbox, rooted by the app’s main IIS (w3wp.exe) process. Easy Auth runs as a native IIS module within the same sandbox. When enabled, every incoming HTTP request is processed by Easy Auth before reaching your application.
Configuring AuthsettingsV2 with Bicep
To configure this, i recommend using Bicep.
You can find this setting in the Azure portal under the following path to view your configuration:
This Bicep template includes the absolute minimal configuration required to successfully deploy this to an existing Logic App for testing:
@description('The Tenant ID of your Entra ID Tenant.')
param tenantId string
@description('The Application ID of the App Registration representing the Logic App.')
param appRegistrationId string
@description('The Object ID of the API Managements System Assigned Managed Identity.')
param apimObjectId string
@description('The name of the Logic App Standard.')
param logicAppName string
resource logicApp 'Microsoft.Web/sites@2024-04-01' existing = {
name: logicAppName
}
resource applicationAuthSettings 'Microsoft.Web/sites/config@2023-01-01' = {
name: 'authsettingsV2'
parent: logicApp
properties: {
globalValidation: {
requireAuthentication: true
unauthenticatedClientAction: 'AllowAnonymous'
}
identityProviders: {
azureActiveDirectory: {
enabled: true
registration: {
openIdIssuer: 'https://sts.windows.net/${tenantId}/v2.0'
clientId: appRegistrationId
}
validation: {
allowedAudiences: [
'${appRegistrationId}'
]
defaultAuthorizationPolicy: {
allowedPrincipals: {
identities: [
'${apimObjectId}'
]
}
}
}
}
}
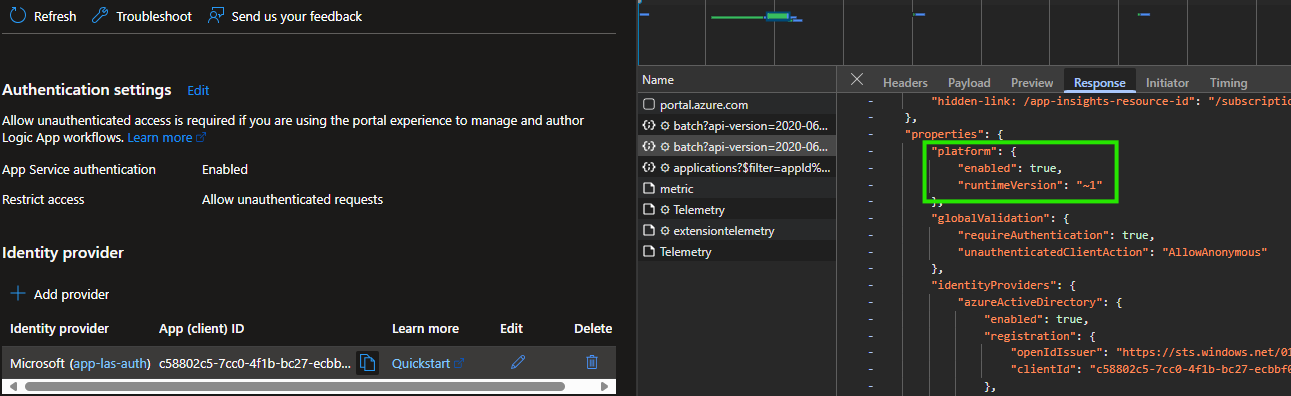
platform: {
enabled: true
runtimeVersion: '~1'
}
}
}
If you’re thinking to yourself, this part cant be nessecary to explicitly include in the bicep:
platform: {
    enabled: true
    runtimeVersion: '~1'
}
Yes, it is! If you don’t include it, it won’t work. You’ll get this response:
{
  "error": {
    "code": "DirectApiInvalidAuthorizationScheme",
    "message": "The provided authorization token is not valid. The request should have a valid authorization header with 'Bearer' scheme."
  }
}
When you include the “platform” part in the Bicep template and deploy it, or if you manually click “Edit” on the Identity Provider in the UI and save without changing anything, it suddenly starts working, even though there’s no visible difference in the resource specification:
I also experimented with not providing the “clientId” in the AuthSettingsV2 registration. This resulted in the same error, making it impossible to enable the feature without it. Since our main goal here is authorization by validating the issuer, audience, and identity/principal, I initially thought the clientId wouldn’t be necessary. Normally, I avoid guesswork, but for this specific part, that’s all I have to go on for now.
If the settings were deployed successfully, you should now see "Microsoft" listed under Identity Provider:
You can inspect it further by pressing “Edit”:

The first thing that might catch your attention is the huge warning at the bottom of the page. This appears because the default setting for “Tenant requirement” is “Use default restrictions based on issuer”.
When reviewing the documentation for what can be configured in AuthSettingsV2, there is no direct option for this setting. It’s not a critical issue, but we still want to explicitly set it to “Allow requests only from the issuer tenant”.
To configure this, you need to add an Environment Variable called “WEBSITE_AUTH_AAD_ALLOWED_TENANTS” and set its value to the Issuer Tenant ID. I recommend adding this to your deployment alongside your other Environment Variables.
If you manually select “Allow requests only from the issuer tenant” in the UI and save, you’ll notice that this Environment Variable gets created automatically.

You might also notice that “Client application requirement” is set to “Allow requests from any application” by default. Since we are already restricting access to specific identities, this setting isn’t really necessary to configure.
However, you could set this to the App Registration ID of API Management’s System Assigned Managed Identity. Managed Identities do have App Registrations, but they are “managed” by Microsoft and not visible in the Azure Portal like regular App Registrations.
To retrieve the App Registration ID of a Managed Identity, you can check under Enterprise Applications in Entra ID or use Azure CLI.
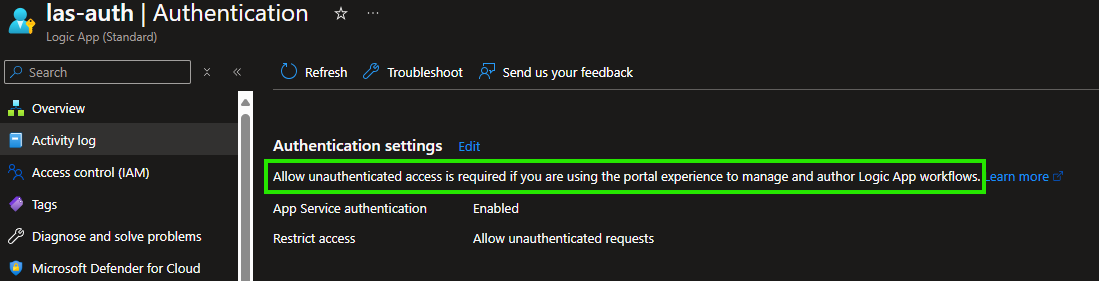
Excuse me, allow unauthenticated requests???
As you might have noticed, I’ve chosen to set “Restrict access” to “Allow unauthenticated requests.” That sounds absolutely insane, why would we do that?
This was a surprise to me too and something I consider a real gotcha!
It turns out that this setting is required if you want to manage Logic App workflows through the Azure Portal. This is poorly documented and is only mentioned in a blog post on the Microsoft AIS blog.
You can find a reference to this blog post when browsing the “Authentication” blade in the Logic App:
It’s quite unclear how this works under the hood and why managing workflows in the portal isn’t possible when “Restrict access” is set to “Require authentication.”
The Microsoft blog post mentions:
“For example, to get run histories, we authenticate it on SAS specific to that run generated based on the Logic Apps access keys.”.
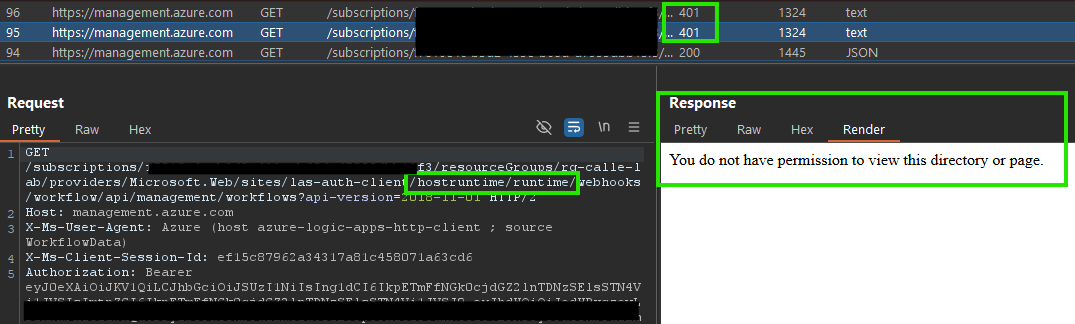
To better understand what’s happening, I analyzed the requests being made when browsing workflows in the portal while “Require authentication” was enabled. The portal sends requests to:
“management.azure.com…Microsoft.Web/sites/logic-app-name/hostruntime/runtime…?api-version=2018-11-01”
These requests authenticate using my user account’s access token, but they are blocked with 401 Unauthorized errors, seemingly by the Easy Auth feature. The response looks identical to what happens when sending a token that doesn’t meet the configured authentication requirements.
Interestingly, when changing the action for unauthorized requests, the response behavior changes accordingly, for example, returning a 403 Forbidden instead of a 401 Unauthorized.
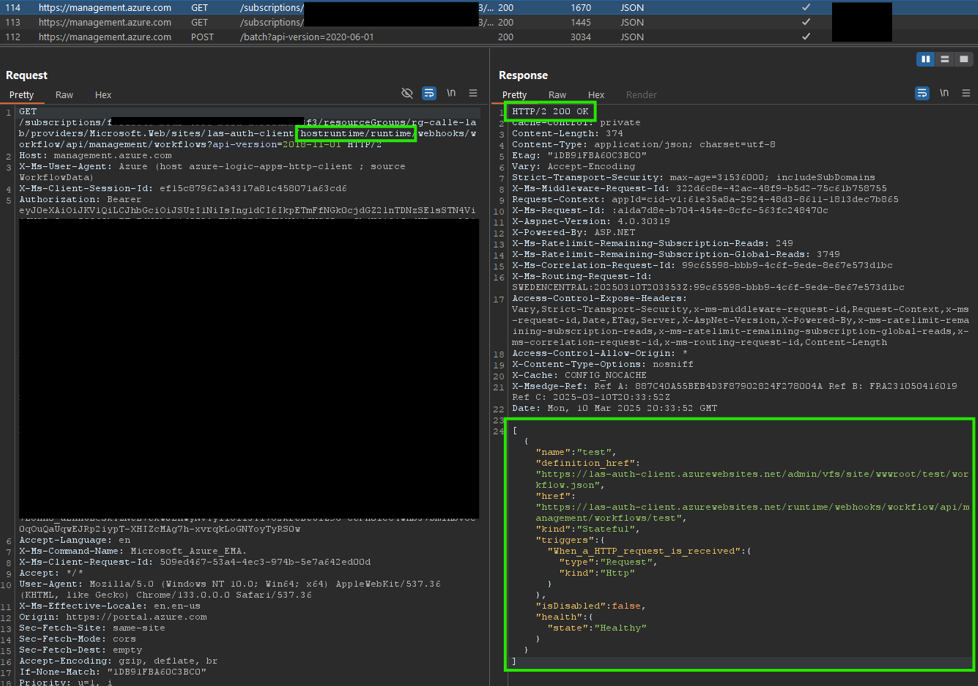
When “Restrict access” is set to “Allow unauthenticated requests,” these requests start working as expected:
This made me skeptical about whether it actually uses a SAS key since I couldn’t see it for myself. I experimented by allowing this token in the authorization requirements in Easy Auth. I managed to get it working when sending the token to the HTTP trigger, but I still got 401 Unauthorized when browsing the portal.
For now, I’m leaving it at that, since the lack of documentation and Microsoft’s own statement that this simply doesn’t work right now.
If you’re not using the portal to manage workflows, you can safely set it to “Require authentication.”
When using “Allow unauthenticated requests,” the HTTP trigger is still protected by the SAS key. You cannot simply trigger the workflow without any authentication at all. However, this setting means we are not enforcing Entra ID tokens for triggering the workflow.
You might be thinking, “If unauthenticated requests are allowed, can’t I just send a random token in the Authorization header and trigger the workflow?” Not quite!
Even with unauthenticated requests allowed, any request that includes an Authorization header will still go through authorization checks based on the configured requirements.
According to the official documentation: “Requests that do not pass these built-in checks will receive an HTTP 403 Forbidden response.”
This means that only requests containing a valid Entra ID token that meets our requirements will be allowed to proceed to the workflow.
Prevent bypassing with SAS key
Just configuring Easy Auth won’t get you all the way to the goal. It’s still possible to trigger the workflow using the SAS key, which we want to prevent. Our goal is to enforce Entra ID tokens as the only authentication method.
There are two primary ways to achieve this.
Option 1: Using an undocumented setting in properties
This is my preferred method, but it could be seen as a bit risky since there is no official documentation for it. You can block the use of SAS keys with a setting in the Logic App properties. However, this setting cannot be configured in the portal, you need to use the REST API, Bicep, or similar methods. I’m using Bicep to configure it.
Important This setting doesn’t work if you have other workflows in the same Logic App that use Service Bus triggers.
I couldn’t find any official documentation on this. I went through most of the Microsoft Learn pages on settings for Microsoft.Web/sites but found nothing.
The way i found out about this was from a comment from the author of the previously mentioned blog post on the Microsoft AIS Blog.
You can add this to your deployment when you create the Logic App:
resource logicAppStandard 'Microsoft.Web/sites@2022-03-01' = {
  name: logicAppName
  kind: 'functionapp,workflowapp'
  location: resourceGroup().location
  properties: {
    logicAppsAccessControlConfiguration: {
      triggers: {
        sasAuthenticationPolicy: {
          state: 'Disabled'
        }
      }
    }
  }
}
Request using SAS keys will now receive this response:
{
  "error": {
    "code": "DirectApiInvalidAuthorizationScheme",
    "message": "The request has SAS authentication scheme while it is disabled under your access control policy."
  }
}
Option 2: Using a condition in the workflow
This method was first introduced to me by Mattias Lögdberg at DevUP Solutions
We can also add a condition that checks if the request includes an Authorization header. If the header is present, the request is allowed to proceed, enabling the workflow to execute as expected:
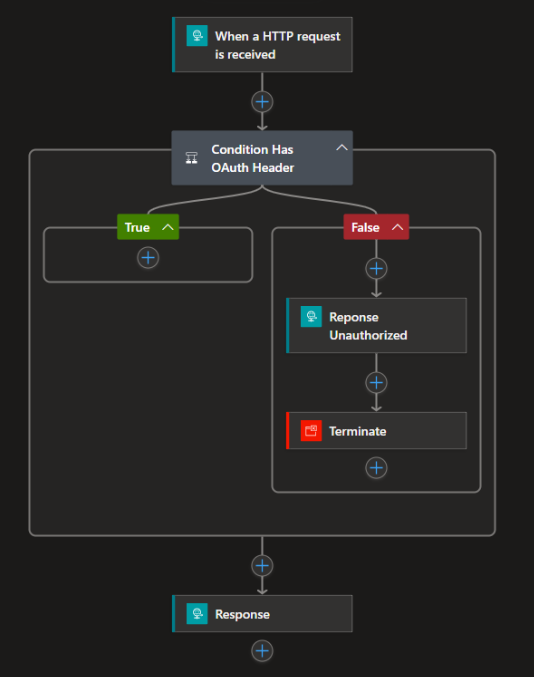
Code example of needed configuration of the HTTP trigger:
"triggers": {
            "When_a_HTTP_request_is_received": {
                "type": "Request",
                "kind": "Http",
                "operationOptions": "IncludeAuthorizationHeadersInOutputs"
            }
        }
The setting “operationOptions”: “IncludeAuthorizationHeadersInOutputs” is required for the workflow to access the Authorization header content.
First, one might think that sending a random Authorization header would satisfy the condition. It may seem that the workflow would simply recognize the presence of an Authorization header and proceed. However, this is not the case. Even with the allowance for unauthenticated requests, any request that includes an Authorization header will be subjected to validation against the specified requirements due to the built-in Authorization checks.
Thoughts on automation and permissions required
To have these kinds of security features scale in a larger environment, automation is a must. Maintaining them manually would be a nightmare.
The primary concern when automating this is when you need to assign permissions for your service connection in Entra ID.
If you were to ask your security team or Entra administrator to grant your service connection permissions like “Application.ReadWrite.All” or Application Administrator, I’m sure, and really hope the answer would be a big no! These kinds of permissions could cause huge damage if the service connection fell into the wrong hands.
Since we are only creating a very blank App Registration, we don’t need these risky permissions. All we really need is a custom Entra ID role with the permission “microsoft.directory/applications/create”.
This only allows the service connection to create new App Registrations. It won’t be able to:
- Create a Service Principal
- Become an owner of the App Registration
- Modify the app after creation
So even if an attacker got access, they wouldn’t be able to do much fun stuff.
This allows us to fully automate the creation of all configurations required to build secure Logic Apps!